Tuesday
Sep172013

MMQAL: Winner!

Howdy folks! We are cruising right along on this lovely Marcelle Medallion QAL! I have been loving the progress. Some people have already finished their tops, and some are just beginning their medallions! I'm in awe of every single one, and I have more than one case of stash envy, hehe!

But without further ado, this week we have our first winner!

Linky #3 is Samantha! Her email has been sent and soon this fabulous swag will be all hers!

Big Prize - 16 Sept

Tomorrow I'll be back with a quick entry on the first and second borders of the Marcelle Medallion and we will also talk rulers! Stay tuned for more lovely tips and another giveaway is in the works...!

Cheers

Penny xx


Wednesday
Sep112013

WIP Wednesday

It's a good thing it's WIP Wednesday now and not yesterday!

WIP Wednesday at Freshly Pieced

My sewing room was a mess yesterday, but I was getting sick of it, and needed to muck it out and clean it up! I have so much on my to-do list that a complete room muck-out seems like a waste of time, but I find I work much better in a tidy, well-organized space. I finally finished at 930pm and my entire self went AHHHH. Then Mr Poppleton and I decided it was date night so we watched Silver Linings Playbook* (my suggestion)!

I have been busy this week but my two major finishes are from WEEKS ago, but they only just arrived at their destination, so I am going to put them up for this week!

Finishes

shattered star

Shattered Star, blogged here.

Washi Windows

And Washi Windows! I must blog about this one properly soon, but it is finally finished, and already in its new home! You can see that it is almost a year in the making!!

I also had a birthday present to make this week. My brother in law is finally home and can be given presents again! (They lived in South America for two years and every card I sent went missing. Imagine my fury!) Last Sunday everyone was over for brunch so I made him spend ten minutes riffling through my stash. I love watching people do this, actually, choosing fabric from my stash! He chose five prints and I decided four of them worked and so I whipped him up a couple of Nesting Bowls, the 4" and the 5" size.

Bowls

Bowls

Bowls

present

We will drop those off tonight along with some brownies. :)

Works In Progress

I'm still going strong on my Marcelle Medallion Quilt (main page for the Quilt-Along here)! I finished assembling border 2 and now have to attach it!

Whew! Border 2 finished (just pinned not sewn on) :) #mmqal

Ongoing / stalled

  • Bee blocks for both AusModBee and IQBS. I feel awful about it - so tonight is the night. I will have those in the post tomorrow, even if I have to take a disco nap and stay up late!!
  • Whitney's Swoon Quilt - this is first out of the gates when I get done with my Marcelle Medallion top
  • Terrain Challenge - I've decided on the borders but I need to cut them, sew them on, and basically just finish it. It's honestly an afternoon's worth of work; I've just come to dearly loathe this quilt top and I don't have the ambition to finish it!
  • O Quilt - I pulled this out yesterday and had a look at it. It'll be a really great quilt once it's finished, I just need to piece the blocks.
  • Trade Winds 2 - just need to bat, back, and quilt this one - all ready to go
  • Picnic Rug - just need to bat, back, and quilt this one too - all ready to go.
  • Pattern writing
  • Designing (not going to talk about this much, but I'm full of hope!)

To Do list

And, the scariest thing... New projects

Okay! That's it for me! How's your week going? Don't forget to link up with Lee!!


*The book was better. There was a lot more to the book. But, I enjoy Jennifer Lawrence in just about anything, and Bradley Cooper has now thoroughly convinced me as an actor that he has chops. :)


Monday
Sep092013

MMQAL: Medallions in Progress!

Wow. Just WOW. Has everyone been following the hashtag #mmqal on Instagram? Has everyone seen the Flickr group? I've been so overwhelmed by the beautiful medallions popping up! I haven't seen a single one that I didn't like. They are all INCREDIBLE!!

Now, last week we covered English paper piecing and foundation piecing, but Danielle (who is, by the way, totally rad) has written up an AMAZING tutorial on freezer paper piecing! Do check it out. This is a really interesting technique and I especially like how easy it makes those Y seams!!

Here's where I am up to. My centre medallion is done, and though I have border one finished, it is a bit wrinkly. I'm going to unpick it and resew it, so you guys only get to see my centre. I chose to foundation-piece it this time and it was a lot of fun!

Marcelle Medallion

Now for the fun part. I've been trying to keep up with everyone's posts on Instagram but I'm lost for blogland! So how about this: link up, show me how you're going, and at the end of the week, you'll be in the draw for a prize!

Big Prize - 16 Sept

A charm pack of Briar Rose, a template set for Grandmother's Star by Victorian Textiles, and a little Polaroid notions pouch (zipper on the other side).

There might be a little something for those who are submitting to the Flickr group too... :)

Link up and tell me how you're all doing!

Cheers

Penny xx


Sunday
Sep082013

a star for a star.

Here for the Marcelle Medallion Quilt-Along? Awesome! The master page is here! I'll be back tomorrow with a few fun MMQAL things but tonight I am finally revealing a quilt I made!!

Ten years ago, I worked at a well-known coffee chain in the Pacific Northwest. I was fortunate to work at a location that had a really great, established group of regulars, and one of those regulars was this totally sweet gal who came in all the time. We became friends. When the time came to decide if I was going to make the big leap (Australia, or not Australia) she was a significant factor in nudging me into it.

I think it's appropriate that while so many of my friends from that time have become strangers, she has endured and become an even better friend. One whose life always seems to touch mine again at exactly the right moments. We keep our eye on each other. Cheer one another on. Share the joy, divide the sorrow, contemplate the unknown and try to make sense of it all. It has been a really special friendship.

This past summer, she got married. What with one thing (Owen) and another (living on aforementioned southern continent) I couldn't be there. And I so wanted to be there, so the only thing I could do was...sew. I began piecing through my stash, trying to find a song in my fabric that would quell my moping urges. I settled on a pattern, and a palette, and thought about her. She really is a top-notch gal. And sewing made the distance seem a lot easier to bear.

So here it is. A quilt for K.

shattered star

Quilt Stats:

"Shattered Star"
90" Square
Made with Kona Snow and a variety of Kona, Michael Miller Cotton Couture and Art Gallery Element solids
Backed & bound with DS Quilts
Batted with 100% cotton batting
Longarm quilted by Jeannette Bruce of The Quilting Platypus with "Oodles of Doodles"

I'm hoping to release this as a pattern in two sizes, probably closer to the end of November. I will keep you all posted and I'd love it if anyone wanted to be a tester (please email me for details).

Wednesday
Sep042013

MMQAL: Color vs Value, Scant 1/4" Seams, and a quick foundation pattern drafting tutorial!

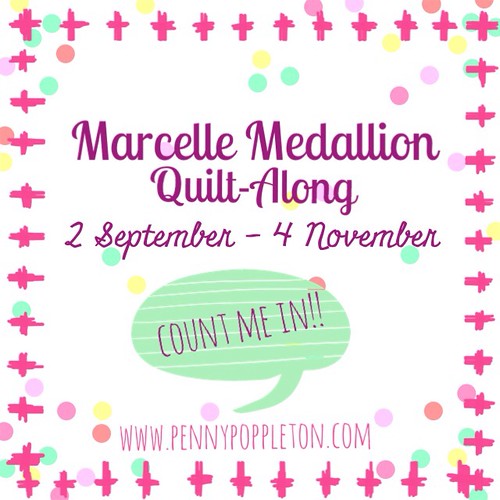
It's a busy day and this is a BIG post! Apologies about the length - I had thought to break it up but figured I may as well put it all in one and then let you busy bees have the weekend to work on your centre medallions if you so choose! (Remember, the official start is next week! I am just hoping to help you with all your prep!)

Firstly, let's talk about choosing your fabric. There are a few key visual design elements to keep in mind, but today we will start by talking about color versus value. I am not an expert, so please bear with me, and it would not hurt you at all to read Jeni's excellent series on the art of choosing. It is chock full of the whys and hows of fabric buying and it changed my wasteful habits to a considered, less-messy approach! Jeni is basically the Hermione Granger of color - if you have a question, dollars to donuts she's answered it somewhere in there - otherwise, send me an email and I'll do my best to help you out!!

Color Vs Value

Value vs Color

In a nutshell:

  • Value is how light/dark the fabric is.
  • Color is where it falls on the ROYGBIV (red-orange-yellow-green-blue-indigo-violet) spectrum.

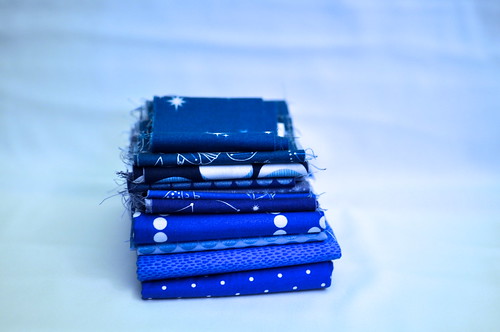
This red spotty fabric looks very different to the blue spotty fabric...

Red and Blue

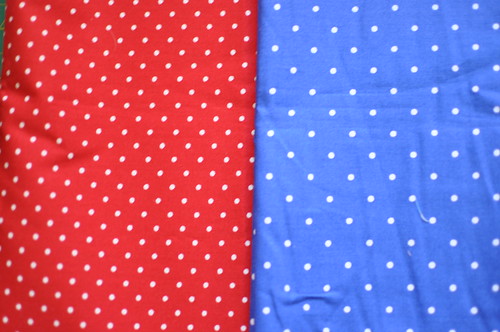
Until you put it in black and white!

Little difference

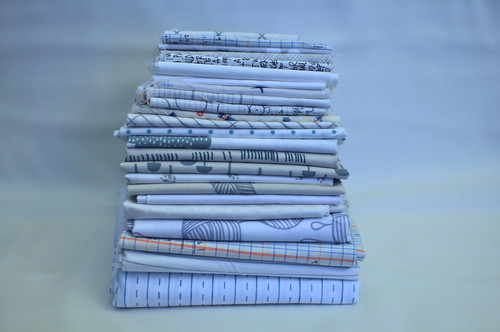
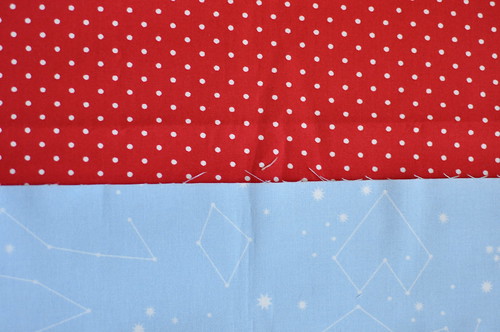
They don't look so different now, do they? That is because though the color is different, the value does not vary. On the other hand, this red spotty fabric looks quite different to the light blue fabric. We don't even need to put that in black and white to see the difference in value.

Med Red, Light Blue

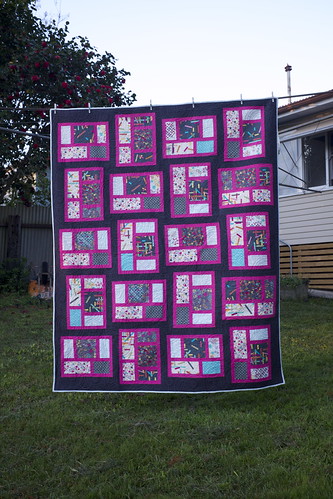
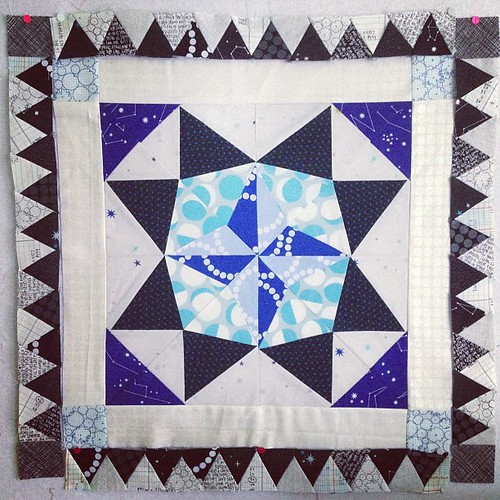
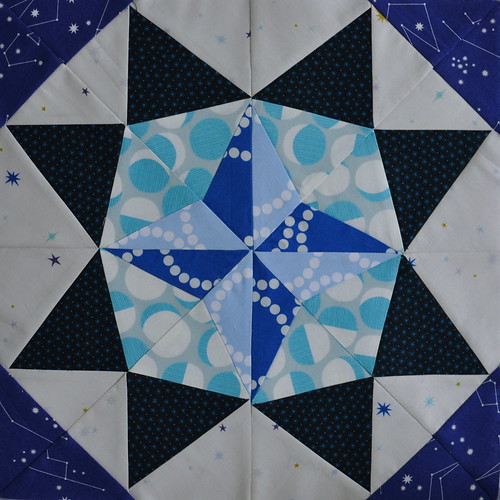
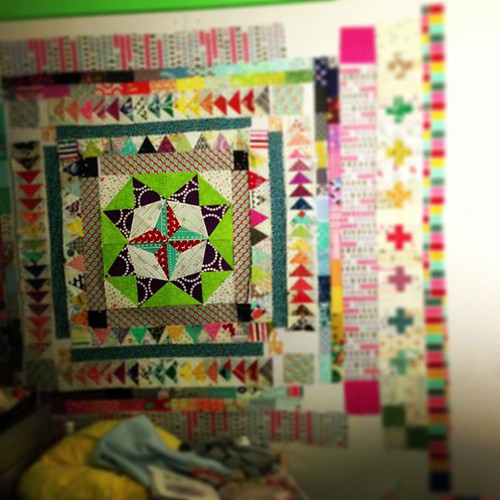
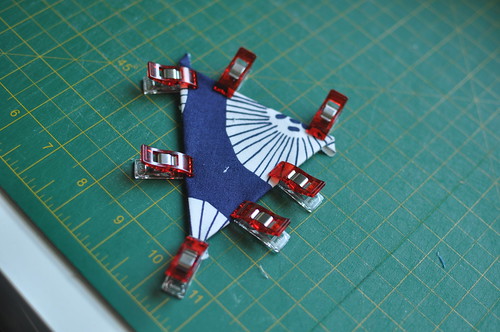
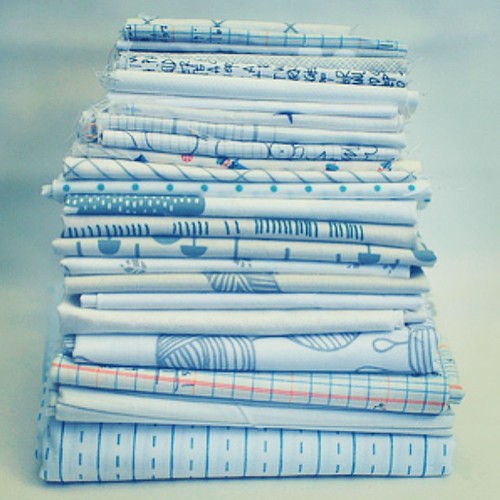
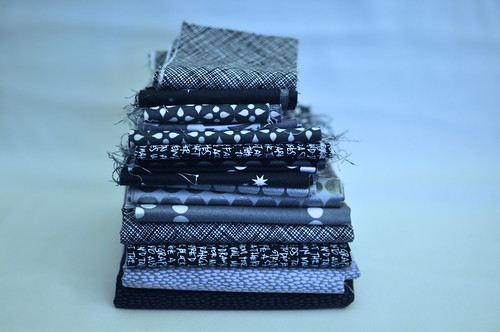
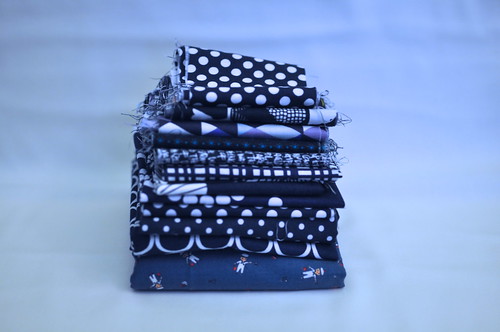
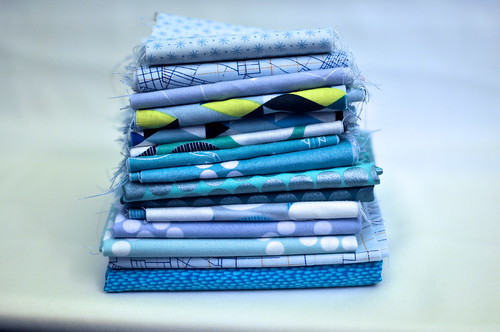
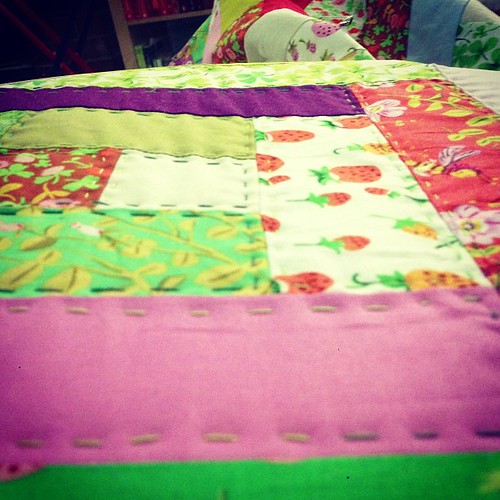
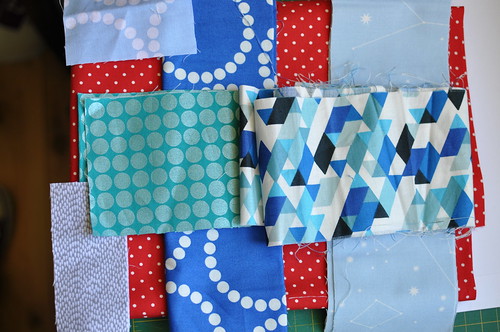
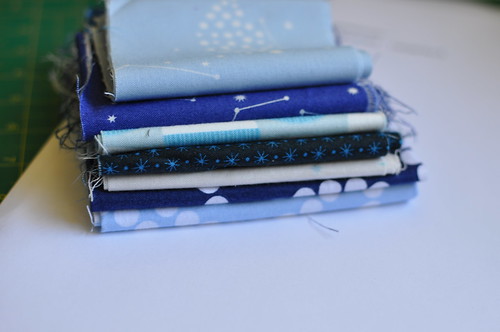
So, bearing that in mind, when you choose fabric for your Marcelle Medallion centre star, you should be looking for a combination of colors that work well together, and keeping an eye on your value. I am doing a cool-color quilt so my contrast for the centre star has to come from value. As you can see, my centre medallion fabric stack is all blue.

Value stack

I had a good browse of the Pinterest Board today before I chose my stack to see what other quilters had put together. I noted that my fabric choices vary in scale - that is, some of the prints are little, some are big, and as a bonus, they are a combination of sharper geometrics and rounded shapes. If you are going very-large scale, consider making those fabrics the plain borders and even incorporating a lot of corresponding solids into your pieced borders! For the centre medallion you want it to be striking, interesting, dynamic, but not overwhelming! You'll know it when you see it.

(Just as an aside, I want mine to look like a supernova! We will see if I succeed.) :)

Hopefully that helps, and if you need inspiration, we have a few places you can go:

Marcelle Medallion QAL Flickr Group
Marcelle Medallion Pinterest Board

Okay! On to part two!
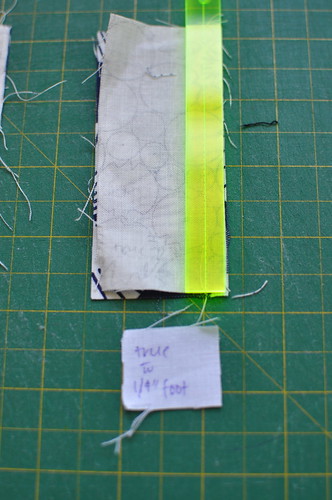
Scant 1/4" Seams

Confession time: when I started quilting, I patched together a bunch of squares in a 9-patch with 3/8" seams. I'm not even embarrassed to admit it - coming from a dressmaking background, I was well-familiar with the good old 5/8" seam and thought I was pretty clever for scaling it down to 3/8"...that was, until I bought an actual quilt book with actual instructions!

Still, it was a good thirty or so quilts later that I began to embrace the scant 1/4" seam. The difference is a few threads, and it's easy to do. It makes for super accurate sewing, and once you go scant, you never go back!

As a quilter, I have a sewing machine foot with a 1/4" seam allowance. On my Janome, it was closer to scant than "true". After sewing on my Bernina for a while, though, I noticed my blocks never seemed big enough. I pressed my seams open, eased and eased, and still had finished quilt blocks a shade too small. All those little extra 1/16ths of inches were adding up, and making my blocks too small.

1/4" Seam Tutorial

My guiding foot, it seems, was for a true 1/4" seam. Alas.

So here is what you can do if you don't have a guiding foot, but want to make a perfect scant 1/4" seam. You'll need:

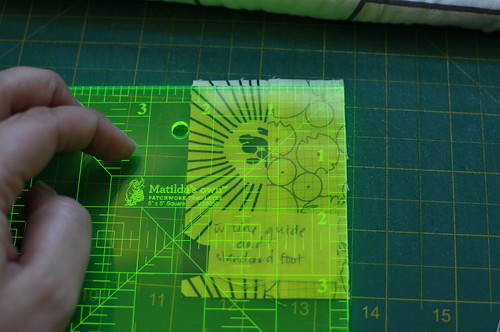
  • a clear ruler with a 1/4" line (I use a Matilda's Own 12" x 1/2"; a similar one can be found here)
  • washi tape or masking tape; alternately, just draw on your sewing machine

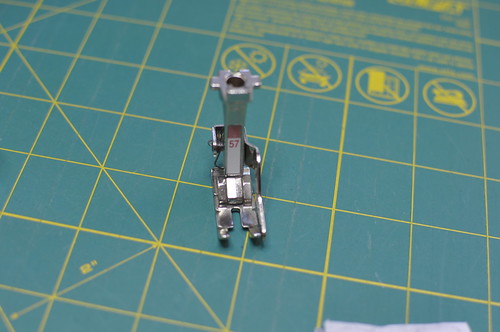
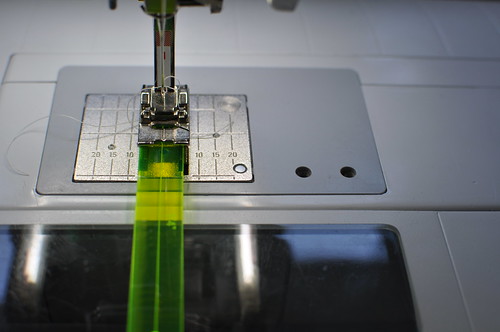
First, this is what most people have on their machines, right? Bog-standard foot.

1/4" Seam Tutorial

Line the quarter ruler under the foot with the seam line right under the needle. This should follow with the guides on your feed plate and whatever is written on your machine (or stamped or printed or embossed on your machine.)

1/4" Seam Tutorial

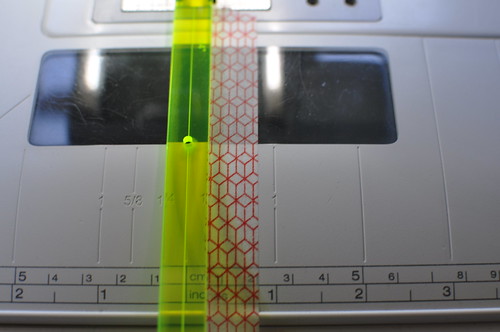
Now move it just a hair to the left. You just want that "seam line" offset a teensy bit.

1/4" Seam Tutorial

See how, when you look at your guides, it's a little less than 1/4"? Just a skerrick less.

1/4" Seam Tutorial

This is where your tape edge should go (or, brave soul, your Sharpie line). Now you can use this as your guide.

1/4" Seam Tutorial

So, say you don't do this, and you decide to just use the sewing machine guides as normal. Same bog-standard foot. I did a test and this is what I came up with when I used my #1 foot and the printed guides (not my scant Washi tape guide). See all the extra fabric hanging over the edge. Bad news bears.

1/4" Seam Tutorial

And, hoo boy, it shows - it's a full 1/8" shorter than it should be. Ack.

1/4" Seam Tutorial

So then I tried it with a 1/4" foot, my #57 foot, which I know to be a "true" 1/4". It's okay, but it still seems to be sewing too far in. I could probably ease this with a lot of pressing.

1/4" Seam Tutorial

You can see here it is just a teensy bit short of the measurement - maybe 1/16th short.

1/4" Seam Tutorial

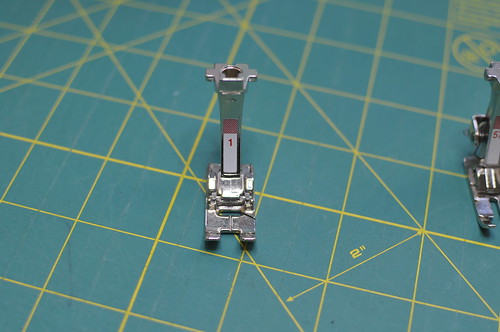
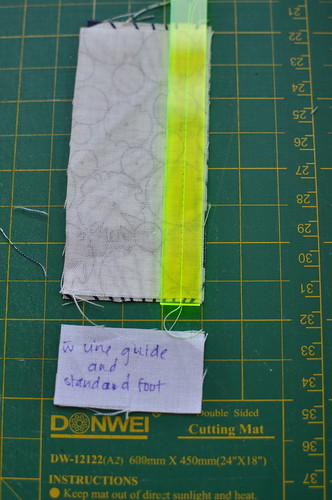
Finally, I tried it with my personal favorite way of guaranteeing a scant 1/4" stitch: I put my #57 guiding edge foot on and moved my needle position one stop to the right.

1/4" Seam Tutorial

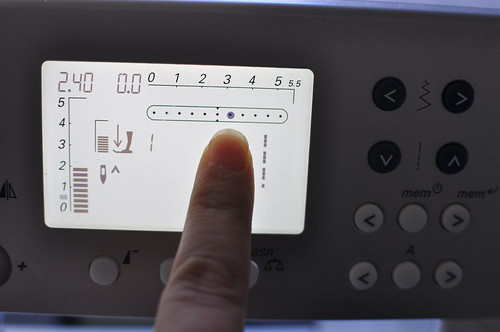
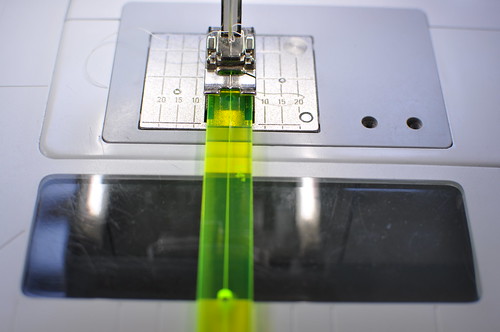
And lo, look at that: a perfect scant seam!

1/4" Seam Tutorial

It definitely meets the measurement and there is even room for trimming (a must if you're as fussy as I am about points and squares!)

1/4" Seam Tutorial

This is worth spending ten minutes making sure you know how to get a scant 1/4" seam on your machine. If all else fails, mark your seams until you can comfortably eyeball a scant 1/4" seam. I still can't eyeball it, though I'm in the neighborhood. I really rely on my needle position trick - in fact, when I turn my machine on, I usually move the needle before I do anything else!

Hopefully that helps! Whew! On to part three!

How to draft a Marcelle Medallion Foundation Piecing Pattern

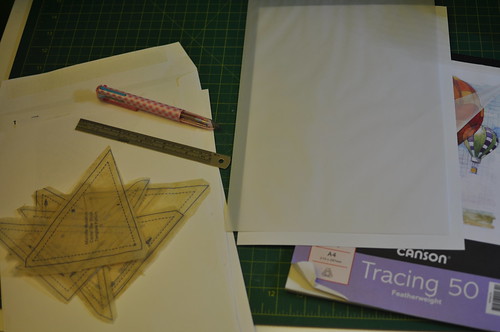
For this tutorial, you'll need:

  • Your Marcelle Medallion centre star pattern pieces
  • sticky tape
  • a ruler
  • a pencil
  • tracing paper (or regular paper and a window)
  • access to a scanner/printer or photocopier
  • eight sheets of foundation piecing paper (or regular paper)

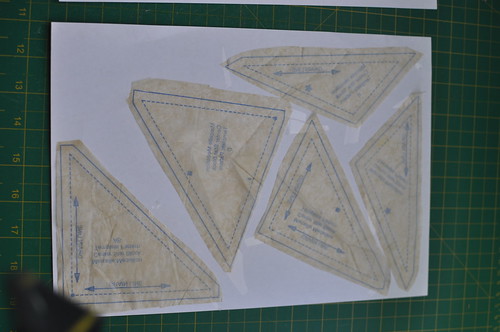
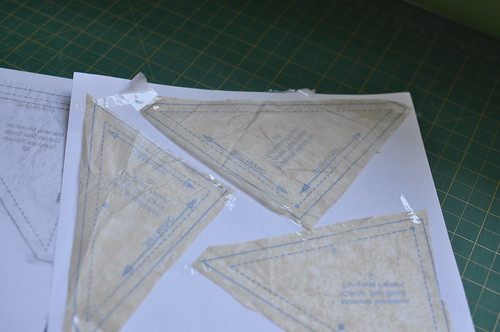
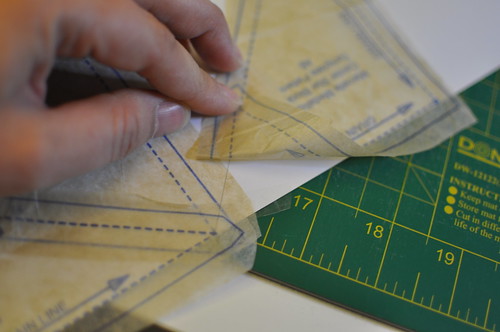
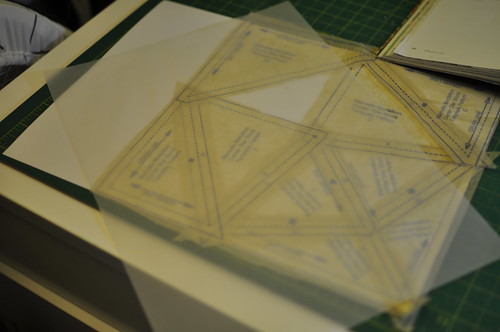
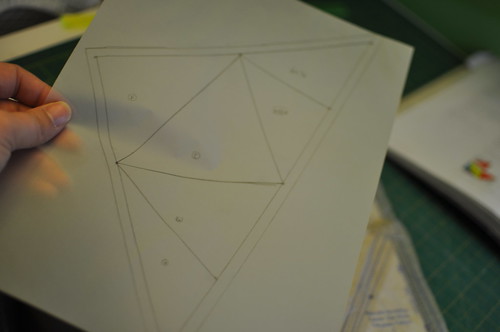
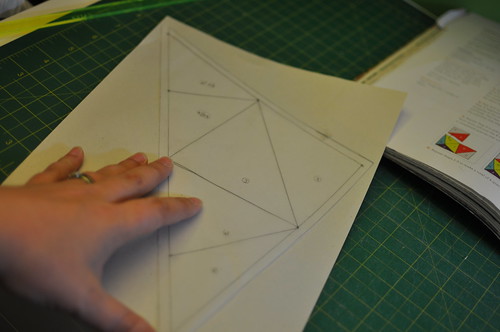
Gather your pieces and supplies.

Foundation Piece Marcelle Medallion Tutorial

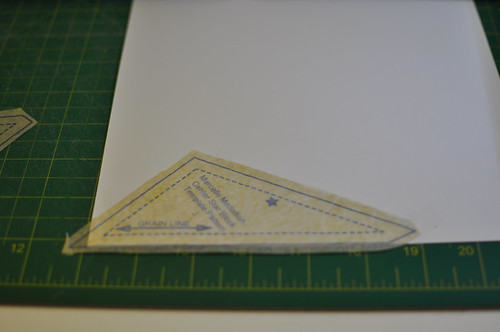
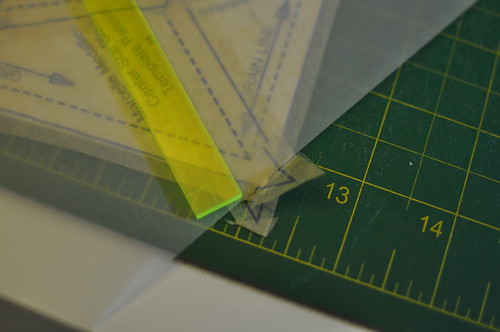
Starting with the points of the star, lay out the first piece (J) leaving 1/4" room allowance on both sides. The bottom of Piece J is the solid line and should touch the paper's edge. Just use tiny bits of sticky tape as you go and use only enough to tack the pieces down - they're fragile.

Foundation Piece Marcelle Medallion Tutorial

Next, match up Piece H (the other star point) by overlapping them and by matching up the dashed lines. Not the solid lines, the DASHED lines.

Foundation Piece Marcelle Medallion Tutorial

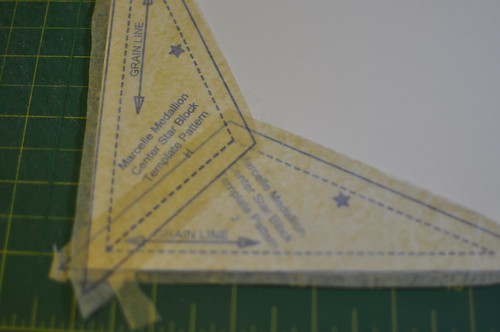
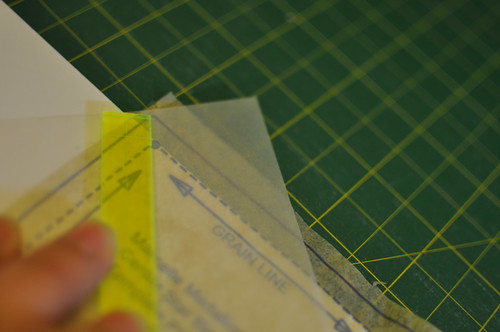
Add piece I to piece J, being mindful of the 45º angle of dashed lines created by the meeting of H and J. Continue this angle perfectly - it's important.

Foundation Piece Marcelle Medallion Tutorial

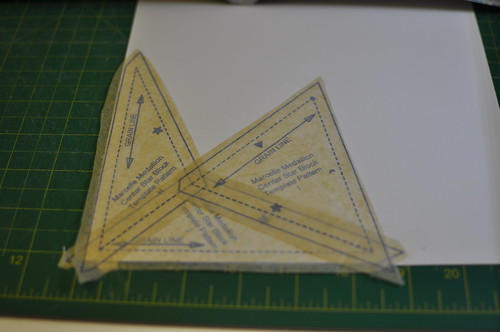
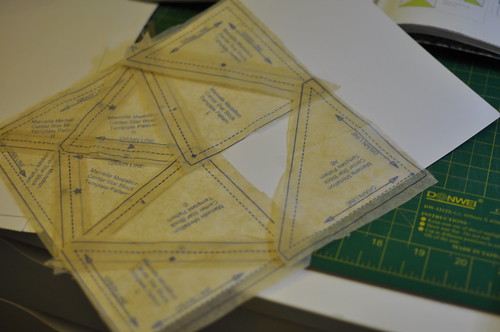
Add Piece G, Piece E, and Piece D, making sure to match dashed lines. Take note that the dot between E and D is perfectly matched, too. Add Piece C and Piece F.

Foundation Piece Marcelle Medallion Tutorial

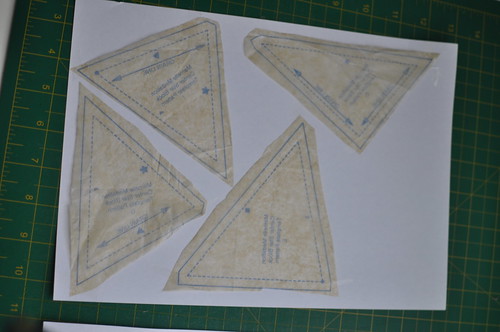
At this point you might have noticed you only have one AB piece! Well, no bid deal. We can fake it. Get your ruler and make a line between the dashed-line points of Pieces E and D.

Foundation Piece Marcelle Medallion Tutorial

Match your AB dashed line with this pencil-drawn line. See? Works great.

Foundation Piece Marcelle Medallion Tutorial

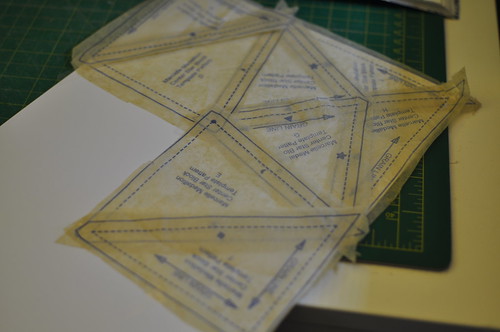
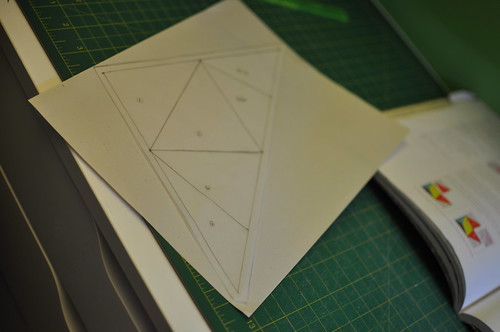
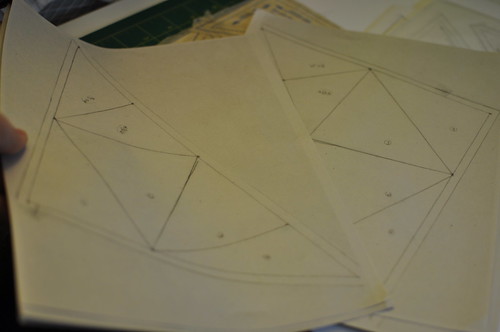
Okay! Now this is looking like a good quadrant! The only thing is, it's still not quite foundation-friendly. It needs to be split into two reflective pieces. Half of the block is already split, but that ends at the dot intersection.

Foundation Piece Marcelle Medallion Tutorial

So we take the ruler and draw in the line, continuing the 45º line through the square. This will bisect both AB pieces but that is the sacrifice of foundation pieces! If it worries you from a fabric perspective, try a busy/nondirectional ditzy print where the pattern won't have a chance to misalign,or stick to a solid for those pieces.

Foundation Piece Marcelle Medallion Tutorial

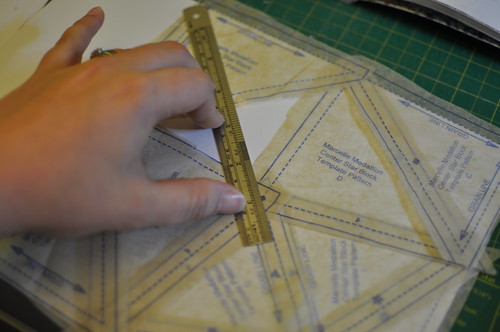
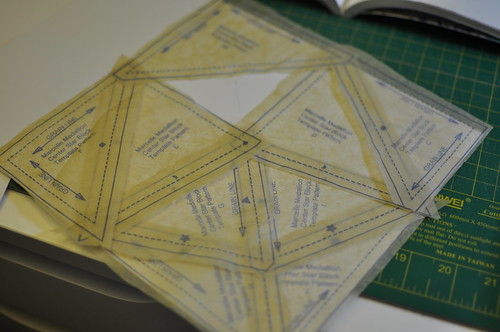
Okay, the line is drawn. Hey, that looks pretty great!

Foundation Piece Marcelle Medallion Tutorial

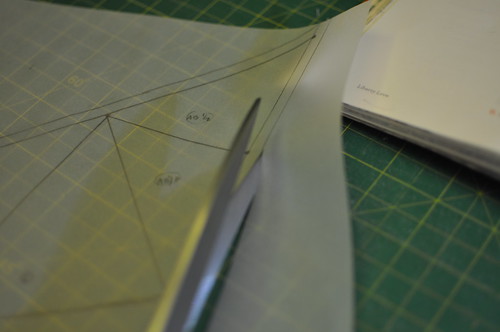
Take your tracing paper, and lay it sideways over the left half of the square. Try to make it fit as best as you can point-to-point within the paper.

Foundation Piece Marcelle Medallion Tutorial

Make sure there's a bit of space at the bottom...

Foundation Piece Marcelle Medallion Tutorial

...and the top. A quarter inch is good, but fiddle with it until you get the right amount.

Foundation Piece Marcelle Medallion Tutorial

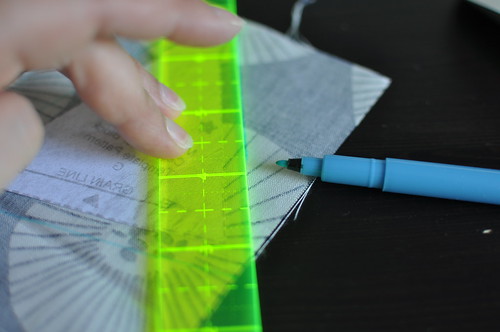
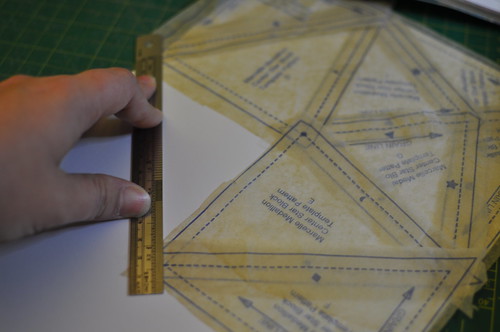
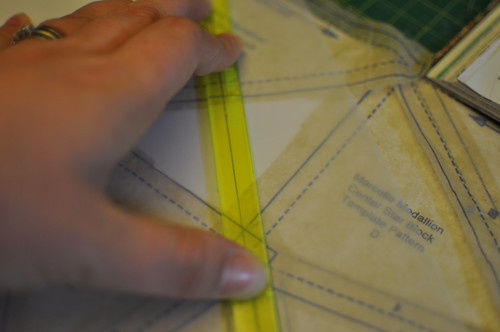
Over your tracing paper, trace the middle 45º line.

Foundation Piece Marcelle Medallion Tutorial

Using a see-through ruler, trace another line to the right of the first line, exactly 1/4" away. This is the outside edge of the pattern piece.

Foundation Piece Marcelle Medallion Tutorial

Then, trace all around the rest of your half-piece. Make sure you trace around the solids and the dashed lines. Be sure to get all the intersections between the blocks. I like to label my blocks as well as I go so I know which is which. When you're done, your tracing paper should look a bit like this.

Foundation Piece Marcelle Medallion Tutorial

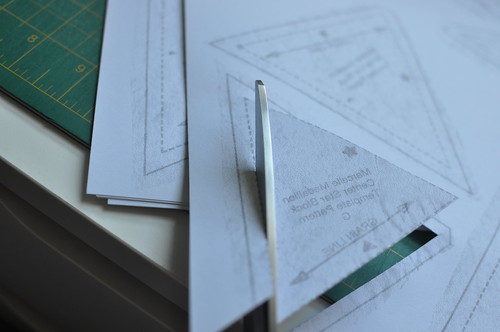
Cut it out on or very close outside of the edge.

Foundation Piece Marcelle Medallion Tutorial

Now, this is the left side of each quadrant.

Foundation Piece Marcelle Medallion Tutorial

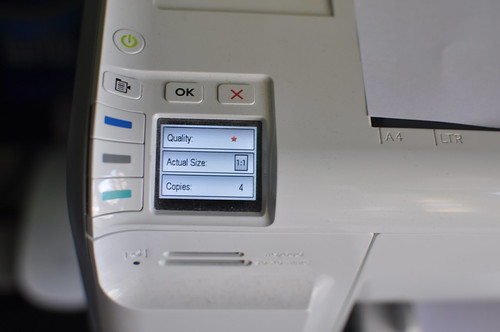
You will need four copies of this. I put it down on some paper and make my copies. The paper just serves as the guide so I know it's on the copy machine correctly.

Foundation Piece Marcelle Medallion Tutorial

Well, now we have our left halves copied...I guess it's time to do the right. BUT WAIT! You can just turn the tracing paper over and VOILA, RIGHT SIDE!

Foundation Piece Marcelle Medallion Tutorial

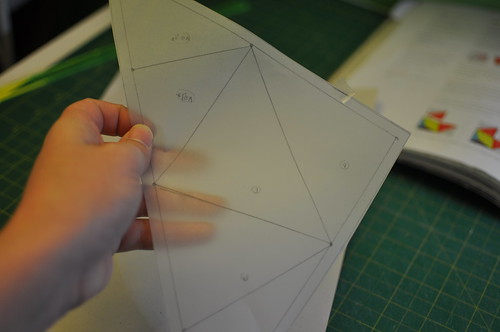
It's like magic, right? Now you see why I used tracing paper! Same thing again, put it on a piece of paper and photocopy it four times.

Foundation Piece Marcelle Medallion Tutorial

Now you have all your pieces!

Foundation Piece Marcelle Medallion Tutorial

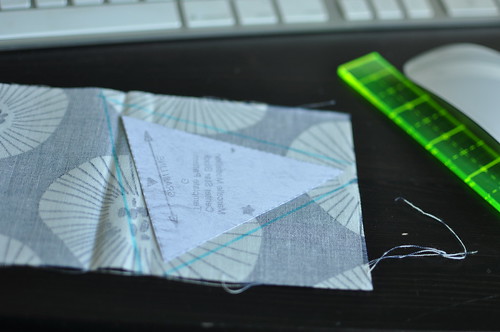
If you're a pro at foundation piecing, start your engines and get going - as usual, start from the centre outward (in this case, the middle of the block - Piece E or D). If you need a bit more guidance, please let me know in the comments and I can photograph as I go with mine, or find a tutorial on paper-piecing on the internet. (I like this one by The Crafty Gemini on YouTube. It's long but really thorough.) And if you save your tracing paper template, you can photocopy it as many times as you like!

I hope this was helpful - I can't wait to get the ball rolling on Monday!!

Cheers!

Penny xx

Tuesday
Sep032013

MMQAL: Centre Medallion Part I EPP

Hi everyone!

Marcelle Medallion Quilt-Along

Today is the day we talk about how to EPP the Marcelle Medallion, the centre of the quilt. Now, if you're not confident with Y-seams, or you want to get a head start, then this is the tutorial for you!

❤ All the borders are done. Now I just have to put it together.

Confession time: my first Medallion was super-wonky. I fussed and eased and marked seams and tried for ages and in the end it was so wobbly. I could have cried. I wanted to make the quilt, though, so I worked out a way to get a nice, flat centre. That's the one you see up there. It's paper-pieced.

First, if you're not familiar with the basics of English Paper Piecing, there are great tutorials here, here, and here. In this instance we'll be making our own templates, though I warn you, paper piecing is addicting and you will soon be browsing PaperPieces.com and telling yourself you can DEFINITELY hand-piece a lone star quilt. Or maybe that's just me. Ahem.

What you will need for this tutorial:

  • Cardstock - 8 pieces
  • Access to a copier or scanner/printer
  • Thread (any old will do)
  • Needles (lots of paper pieces swear by Clover Black Gold needles, I use milliners/straw size 9)
  • A ruler with a 1/4" measurement
  • A pen or pencil
  • Scissors

Okay! Let's get to it!

Marcelle Medallion EPP Tutorial

First, get your pattern pieces from the back of your Liberty Love book and cut them out. I cut mine loosely since I knew I would be tracing or copying them. Now you will need two A4 or letter sized pieces of paper. Arrange them loosely on the paper with enough space on both pages for the piece marked AB. Use a teensy bit of tape to fix it to the paper.

Page 1

Oh, and put them on upside down. Imagine the fabric going over the cardstock - it would cover up all the matching symbols etc if they are right side up and you don't want that. So if they are photocopied upside down, the right side up will be under the wrong side of the fabric. If that makes sense!

Anyway, this is what page 2 should look like. See that gap? That's for AB.

Page 2

You need 4 cardstock copies of page one. I like to use the draft or low-quality setting on my printer.

3. I use a "draft" setting. Make 4 copies.

Copy page one, then transfer pattern piece AB to page 2. Make four cardstock copies of page 2. Now you've got all your paper pieces!

4. Move piece AB to your second page. Make 4 copies.

I like to store the master pattern pieces still stuck on the paper, so you can tuck them into nice big envelope with the rest of the patterns from the book and know they are all kept together.

Now, to cut the pattern pieces out! Because EPPing means you are making hyper-accurate pieces of the *finished* piece, for this pattern, you cut the dashed line, not the solid, outer line. The dashes are thick so I try and cut exactly in the middle of the dashes! You can use scissors, as I've done here, or a ruler and rotary cutter if you have a steady hand.

5. Cut out on the DASHED line.

Once you've cut the pieces out, lay them out on your fabric, "wrong-side up" for both pattern piece and fabric. Use your 1/4" ruler to mark a seam allowance all around the piece.

6. Trace around with a 1/4 ruler.

Once you have the shape  drawn out, go ahead and cut it out.

7. All ready to cut out.

I like to wrap the fabric around the shape using my Clover Wonder Clips and then take them off one by one as I baste.

8. I use wonder clips to bind!

Okay! That's how you make paper pieces for the Centre Medallion!

A quick note on basting/sewing them together: I haven't photographed this bit because I haven't started it yet, but if you sew this, make a note to sew this in quadrants (top left, top right, bottom left, bottom right) from the center outward (so the points of the star, then outward.) Also, if you can, make all the intersections between the quadrants as straight and perfect as possible!

I hope this is clear - if it isn't, feel free to shoot me an email and I'll do my best to help you out!

Tomorrow we will go over getting a scant 1/4" seam, choosing fabric, and color vs value! See you then!

Cheers!

Penny xx


Monday
Sep022013

MMQAL: Intro!

Hiya folks! Hopefully you've spent the last week thinking about color, value, and buying your copy of Liberty Love! I couldn't help myself. I put together my fabric stacks!! It has been really exciting following the #mmqal tag on Instagram and seeing everyone pulling fabric and roping their unsuspecting friends into this Quilt-Along! ;)

Marcelle Medallion Quilt-Along

This week is the intro, where we set out the schedule, talk a little bit about prizes, and I've even included a sneaky tutorial for English Paper Piecing (EPPing) the centre medallion! Let's get started.

liberty love

A low volume stack for the #mmqal! Ooh I like this one.

By now I hope your book is either in your hot little hands or on its way to you! I can't tell you how much I love the projects in this book - there are clothes for mamas, babies, projects for sewing, for everyday use, and for sheer beauty! There are things you can make in a day, and things you can do in an hour, and longer projects, like the Marcelle Medallion Quilt! As I mentioned last week, you can get the book ! And the fabric is so beautiful, not only the Liberty, but everything else, too. You can find it on Amazon, on Book Depository, Better World Books, and signed copies at Alexia's shop. (Alexia, bee tee dubs, is super excited about our Quilt-Along too! More about that later.)

As always, the master post for the Marcelle Medallion Quilt-Along is HERE but you can subscribe to my blog and keep up as we go along!

Follow on Bloglovin

Quilt Along Schedule

  • 2 September - Introduction, Schedule, Tools
  • 3 September -  Center Medallion Part I EPP
  • 4 September - Color & Value, Choosing your fabric, and scant 1/4" seam tutorial.
  • 9 September - Centre Medallion Part II, Y-seams tutorial, freezer paper tutorial, prizes list!*
  • 16 September - Borders 1 (solid) and 2 (60º triangles), using a 60º triangle ruler tutorial or template plastic.*
  • 23 September - Border 3 (solid) and cutting Border 4 (flying geese). Tutorial on fast and accurate cross-cutting with your ruler.*
  • 30 September - Assembling Border 4. Chain-piecing tutorial.*
  • 7 October - Border 5 (strips) and Border 6 (solid).*
  • 14 October - Cutting out Border 7 (pluses), cutting out Border 8 (solid).*
  • 21 October - Putting Border 7 together (pluses).*
  • 28 October - Put the quilt top together! Tips for easing, wonkiness cures, and the wonders of pinning.*
  • 4 November - Show it off!*

Prizes

To join into this QAL, all you have to do is sew a Marcelle Medallion Quilt! But to be eligible for a prize pack, you need to join the linky at the bottom of each MMQAL post, starting 9 September, and post a picture of your progress! There are also little prizes awarded each week to commenters on this blog, so don't be shy! We want to see how you are going!

There are prizes offered each week with a * after it, and the prize winners will be chosen by Mr Random Number Generator. Prizes will be awarded in the next week's MMQAL blog post. All linked-up persons are eligible but if you want a bonus prize by commenting on the blog, you must leave a valid email address or Mr Random Number Generator will choose someone else. :)

To be eligible for the grand prize, you must have a completed quilt top!

The prizes will be listed sometime later this week. The first prize draw (and first linky party) will begin on September 9 so put that in your calendars!

All right, now that the housekeeping is out of the way, let's have a quick chat about tools!

Tools for quilting

Optional Tools for the Marcelle Medallion Quilt:

All right! Gather up your tools, have a good look at your fabric, write down all those dates somewhere, and I'll see you tomorrow to talk about English Paper Piecing the centre medallion!

Remember if you have any questions, I am all over the place! Instagram, Twitter, email, and this blog too! Shoot me a message if you have any questions! I try to have them answered with a day! If you want to join in on group discussions, we have a Flickr Group too, and if you're looking for inspiration, check out our Pinterest Board!

Cheers!


Penny xx


Thursday
Aug292013

WIP Wednesday

It comes around every week, and it is WIP Wednesday!!

WIP Wednesday at Freshly Pieced

This week is a bit strange. I have two solid quilty finishes but because they are gifts, I can't put pictures of them up! Oh well, maybe next week!

How about a sneak peek though. :)

International quilt parcels get the FULL Washi treatment!! :)

Ha! I'm so mean. :)

I have a list of WIPs that need attention though. Let's see if I can remember all of them!

  • August bee blocks (AusModBee)
  • September bee blocks (IQBS)
  • Prepare for October bee blocks to be sent out (my month!!) (AusModBee)
  • Kat's Quilt ("Navigating by the stars") - it is stalled. I actually want to work on this while Kat is away galivanting around Europe and I am missing her horribly. It will be nice for her to come back to a finished quilt, right?
  • Whitney's Swoon Quilt, AKA, the quilt that I just need to finish because I am the worst sister ever.
  • Terrain challenge - I have been thinking about this one and I've decided on a simple pieced border. I just need to dig it out and sew it up!
  • O quilt - It is cut out and ready to start.
  • Orange & aqua quilt - same, cut out and ready to start!

My biggest WIP, for the next twelve weeks, though, is the Marcelle Medallion QAL!

Marcelle Medallion Quilt-Along

I'm so excited about this. Danielle and Jeannette and I put the word out on Instagram last night and we have been overwhelmed with enthusiam and support! It looks like we're going to have a lot of quilters quilting along with us! It will be so fun to award prize packs and keep up with and encourage one another, and I can't wait to see what everyone comes up with!

I had to start pulling fabric for my Marcelle Medallion quilt today! Here is what I came up with.

low volumes

greys & blacks

navy blues

medium blues

lighter blues

I decided to stick to a fairly cool/cold palette of navy, blue, greys, and blacks paired with cool low-volume prints. I had a lot of fun choosing certain fabrics to add to these stacks - you'll see Mirrorball Dots, Pearl Bracelets, Architextures, and Constellations in the colors, and Maze & Vale and Lila Ruby King boutique fabrics in the low-volume stack - so this will have a much more restrained feel than my original Marcelle Medallion quilt, both in color use and in sheer scrap factor!

Whew. I can't wait. :)

On the list for this week are a few little quilting tasks!

  • Write up the polaroid tutorial for the Sydney Modern Quilt Guild Swap!
  • Organize a little stitchy get-together for some friends for the end of September
  • Sew some pouches for prizes
  • Cut some charm packs for prizes!

I also have one more thing to send...a present for a friend many miles away! More details on that later, if I remember! :)

How is your Wednesday going? How are your works in progress? Be sure to link up with Lee!

Cheers!

Penny xx


Wednesday
Aug282013

Marcelle Medallion QAL Announcement

Marcelle Medallion Quilt-Along

Howdy folks! It's time for a Penny Poppleton quilt-along, and what better project to quilt along with friends than the gorgeous Marcelle Medallion quilt from Alexia Abegg's fantastic book Liberty Love?

liberty love

So, I'm not one to tell you what to do with your life, but you should really consider buying this book. Not only does it have beautiful quilt patterns but there are dresses, sewing notions, and bags in there as well! And the fabric is so beautiful, not only the Liberty, but everything else, too. You can find it on Amazon, on Book Depository, Better World Books, and Alexia's shop.

Now, confession time: I made this quilt already.

marcelle medallion

But I loved it so much I wanted to make it twice! And I learned a lot along the way, so I'll be imparting tips and tricks to get through the tricky parts. And since I'll be sewing alongside you, and I'm obsessed with my iPhone, you can reach me pretty much anytime to chat about how it's all going!

The introduction to the Marcelle Medallion QAL (aka the MMQAL, hashtag #mmqal on Instagram and Twitter) will be on September 2, and we will kick off September 9th! (Note: that's Australian time!) The MMQAL will run for ten weeks, until November 4. If you're interested in joining in, please do! There will be prizes almost every week, linky parties, and tricks and tips too! It should be a lot of fun. It's a great little quilt to make and if you finish the top by the wrap up date, you are eligible to win a FABULOUS grand prize!

I have two awesome helpers: Danielle and Jeannette. Not only will they be contributing blog posts but they are going to have fabric for some very lucky winners!!

You can find me on Instagram, Twitter, or email me!

Our group pinboard is on Pinterest here.

Join the Flickr group here!

Grab a button for your blog!


The master post for the QAL is HERE so you can always refer back, but I would recommend following this blog to keep up to date!

Follow on Bloglovin

Can't wait to get started - see you all on 2 September for the Introduction Post!!

Cheers!

Penny xx


Tuesday
Aug272013

the busy girl.

i spent the last couple of weeks binding. it's not my favorite quilting task, but once i get into it, i like to do ALL of the binding. ALL OF IT. so i finished a few quilts that have been lingering in my queue.

I found the perfect binding for @quiltjane's quilting :)

Scenes from a mama quilter's life: binding with one on the lap and the other playing!

look, i can't show you the whole thing. really. the quilts are gifts and one has been sent, and the other one is about to be sent, so i don't want to show them off until they are in their new homes. but there, glimpses.

okay.

i've also been hand-quilting my briar rose log cabin quilt. it is looking so good.

Loving the texture!

we watched a few movies together, mr poppleton and i, while i quilted. first star trek: into darkness, because come on, it's got benedict cumberbatch (or, as we know him, bentobox lumberjack).

we watched oblivion, which was surprisingly good. i'm not a fan of the lead actor at all, and it would be really awesome if the lead females had been born in the same decade as the male lead (not two decades later!) because, frankly, i am tired of men in action movies being married to 25 year olds for their entire career. but i did enjoy the story and the twist was good. it did sinister very well.

then we watched moonrise kingdom.

you guys.

you guys.

it was incredible.

i have been a wes anderson fan since, as a wee little 18 year old, i caught royal tenenbaums on cable at a friend's house. i was fascinated with it, how the movie itself was like a slow-developing polaroid, how the colors and illustrations and music all formed this seamless whole. i obsessed over that film. i still love it, in fact. i was excited to watch moonrise kingdom but i couldn't find the time for ages. we finally carved out the time last weekend and afterward, we both sat there and just kind of smiled. i can say definitively that my husband enjoyed it and he is the action movie genre's number one fan, so you can rest assured it is something special.

i also finished up grand designs: australia, and i have to say that while i enjoyed it (especially the clovelly house and the darwin house) i was not as invested as with grand designs: uk. i just don't think anyone ever comes close to kevin. he's like my best friend that lives in the television, which is what makes him a successful host!

okay but i don't just watch tv, i promise! this week was also the husband's birthday, so i made brownies, we went out for breakfast at butcher's block (which was amazing), we held hands, we walked, we talked, we looked into each other's eyes, we told jokes. it was nice to connect, just the two of us, knowing that our kids were safely somewhere else and we could just be. i wish we had more time like that. i'm spoiled rotten with love and i hope my husband got a little bit of that good feeling for his special day.

Today was a BIG day. So big.

oh. i haven't mentioned this yet, but we have taken our gorgeous puppy back to the breeder's. she (the breeder) is planning on breeding pancakes while our human babies grow up a bit, and by the time she (the puppy) comes back to us, she will be calmer, and our kids will be bigger, and the timing will work out a bit better. i wasn't able to spend as much time with her as i wanted to, and she was feeling it, poor puppy...now she is having the time of her life there and the breeder just loves her. our breeder has renamed pancakes PC which suits me just fine, though i might call her "piecey" as in a piecey quilt!

anyway i am very sad about this,  because i failed to be awesome at looking after a puppy, and because our poor dog was so lonely. but my human babies come first, so my fur baby was getting very sad.

Don't make me go out in the rain, Mama! #poorpuppy

so that's me caught up. exciting things are afoot though - i am still working on a quilt pattern (my first!), designing my second (!!), working on some textile designs (!!!), and next week...we will have a QUILT ALONG! my very first. i'm so excited. more on that later, though - the tiny blonde one is very cranky. i think she needs some lunch!

cheers!

penny xx


Page 1 ... 4 5 6 7 8 ... 19 Next 10 Entries »